The task for security practitioners is steadily becoming more difficult. There are more devices to secure than ever before, systems are highly distributed and complex, and they produce colossal, cloud-scale data. Set against the backdrop of a relentless and evolving threat landscape, workloads are increasing along with the need for automation and agility.
In this blog, you’ll learn how to harness a modern threat detection workflow that is founded on automation and agility—detection-as-code (DaC) with a continuous integration and continuous delivery (CI/CD) pipeline built with GitHub Actions. In this workflow, you’ll:
Whether you’re familiar with these concepts or not, this blog will guide you through top-level concepts to implementation details. If you’re ready to implement a CI/CD pipeline in your DaC workflow, skip ahead to the section “How to create a CI/CD pipeline to automate DaC workflows”.
It’s well known that cybercrime is big business, a trillion dollar economy that is only projected to grow. Accordingly, attackers have adopted professional business models to develop new methods and tools in order to consistently deliver value—successful attacks that rake in money.
Recent examples include Midnight Blizzard successfully gaining access into Microsoft systems using “low and slow” methods to avoid detection. Meanwhile Scattered Spider and the Lazarus Group used highly sophisticated social engineering tactics to fool employees into granting system access through credentials or malware.
With AI in the mix, attacker and defender capabilities are increasing across the board. Just as AI is reducing toil and improving detection and response for defenders, it is also increasing the effectiveness of social engineering attacks. So while advanced and persistent attacks become more prevalent, AI capabilities are dramatically scaling up everyday phishing and malware attacks.
On the defender side, workloads are increasing. This is caused by the ongoing cybersecurity workforce shortage as well as the steady increase in the volume, velocity, and variety of security data and the work that is required to manage this data and surface threats with high-fidelity.
Staying ahead in this environment unequivocally requires threat detection and response workflows that meet the demands of increasing workloads. This means workflows that:
Next, let’s get into the concepts: detection-as-code, continuous integration and continuous delivery, and GitHub Actions.
With detection-as-Code (DaC), security practitioners author detection content using code like Python or YAML, and manage the detections using version control, just like software source code.
But that’s just the mechanism. The reason why security practitioners consider DaC effective is because it applies time-tested software development best practices to threat detection and response workflows that support agility and automation. Detection-as-code has these core features:
Continuous integration and continuous delivery (CI/CD) is a longstanding software development approach that uses automation to improve the speed, efficiency, and reliability of software delivery—or threat detection, in the case of detection-as-code.
Setting up a CI/CD pipeline provides many benefits. Frequent and smaller code changes mean easier troubleshooting, rollbacks, and reduced overall risk. Integration and deployment automation speeds up the development cycle, and frees up practitioners’ time to focus on optimizing threat detection and response.
GitHub Actions is an automation platform that GitHub provides to its users to not only develop CI/CD pipelines, but automate labeling GitHub issues, creating release notes, assigning issues to repository collaborators, and much more.
To automate a process using GitHub Actions, you create a “workflow” that executes predefined actions in response to various triggers like a scheduled event, pushing a commit, or creating a pull request. A workflow is one of the five main components that make up GitHub Actions:
Finally, GitHub is just one of many version control and CI/CD platforms that you can use to manage your detection content. Alternatives include GitLab, Jenkins, and CircleCI among others.
In the next section, you’ll set up a CI/CD pipeline using GitHub Actions to automate a detection-as-code workflow with Panther. After everything is set up, here’s what your typical workflow will look like:
Steps 4 and 6 are fully automated in the CI/CD pipeline. This workflow is repeated for every change to detection content, however there may be variations your organization takes like squashing or rebasing commits before merging. There are a few other implementation details missing, but that’s what the next section is about.
Now for hands-on learning. This section will guide you on how to use GitHub Actions to set up a CI/CD pipeline for Panther’s detection-as-code using the command line interface (CLI).
Panther provides templates for GitHub Actions workflows in the panther-analysis repo to make getting started simple. So in this section, you’ll learn the basics of GitHub Actions and how to use the workflow templates effectively.
You’ll understand:
Quick disclaimer: The code snippets in this blog may differ from the current workflow templates in the panther-analysis repo due to later improvements by Panther’s software engineering team. Even so, you’ll still get everything you need to get started with the templates in this blog.
Here’s what you need to get started with Panther, DaC, and GitHub Actions:
Open up your copy of the panther analysis repo in your preferred code editor, and locate the .github folder within the file tree.
The .github folder contains anything GitHub related, most often templates and GitHub Actions workflows.
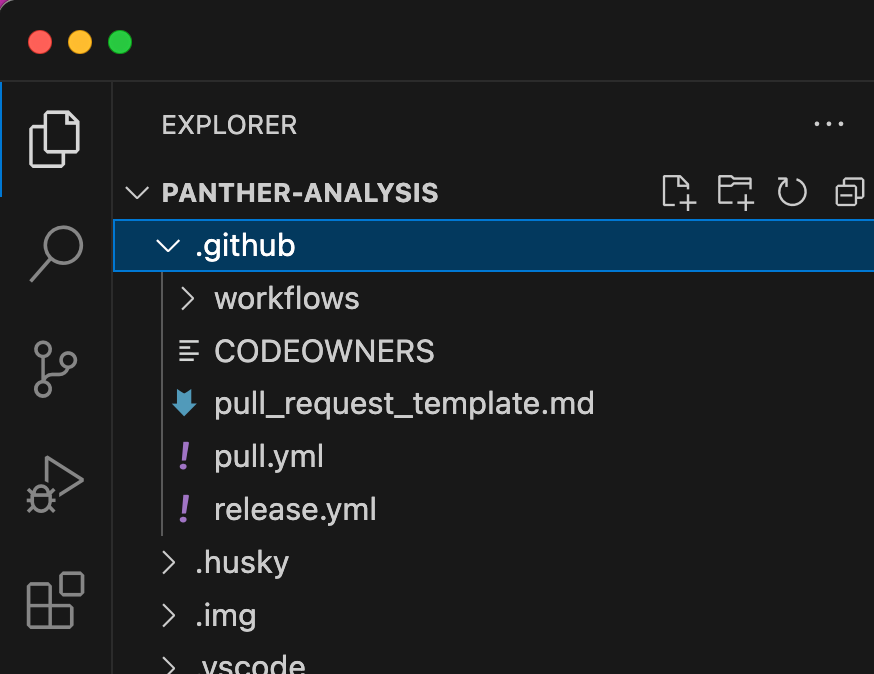
At the top level, you’ll find two templates that you can update or delete as needed:
Both pull.yml and release.yml are used internally by Panther and should be left alone.
You’ll also see a workflows folder. This is where all of the GitHub Actions workflows are saved, and where you’ll find a handful of workflow templates.
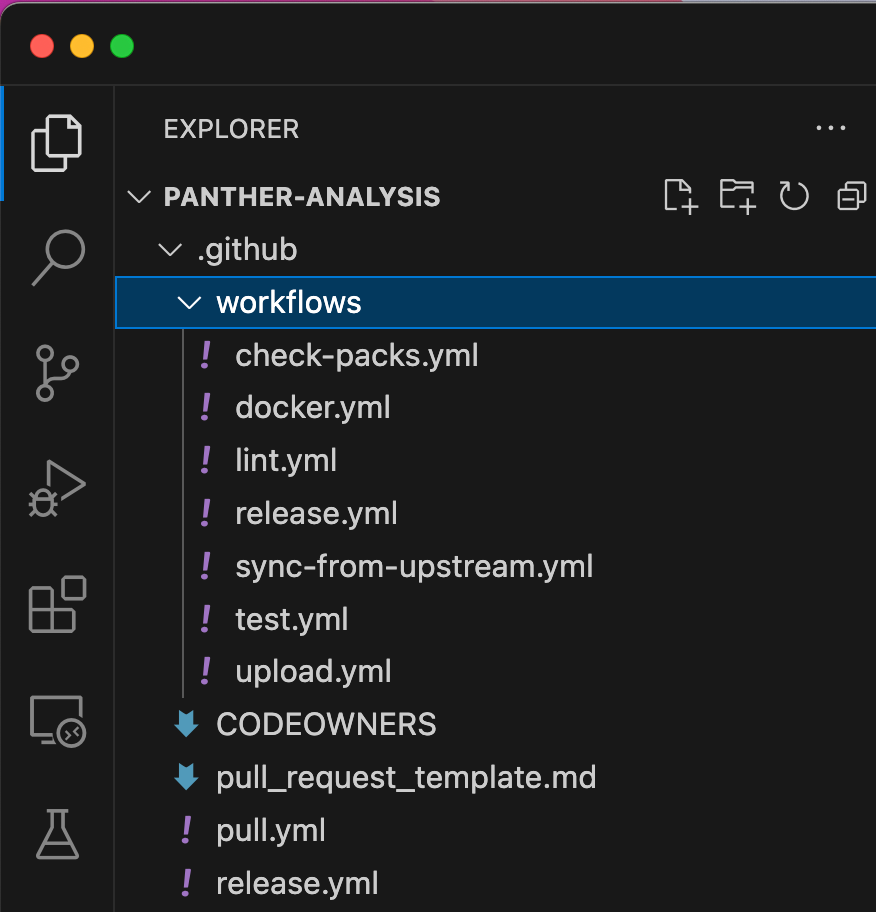
The check-packs.yml and release.yml workflows are used internally by Panther and should be left alone. You can use the remaining workflows as-is or further configure them:
Together, lint.yml, test.yml, and upload.yml make up the CI/CD pipeline. The rest of this blog explains how these files work.
You can create a new workflow locally using the CLI or within GitHub. To create a new workflow using the CLI, follow these steps:
GitHub will automatically discover any workflow in the .github/workflows folder and invoke them when their triggering event occurs, like a push to a branch. Next, let’s dig into the YAML to clarify how this works.
test.yml is a continuous integration workflow that runs all tests in the repo when changes are submitted through a pull request. This ensures that new changes work as expected, in addition to all existing code—detection rules, policies, schemas, etc.
Take a look at the YAML in test.yml:
on:
  pull_request:

jobs:
  test:
    name: Test
    runs-on: ubuntu-latest

    steps:
      - name: Checkout panther-analysis
        uses: actions/checkout@0ad4b8fadaa221de15dcec353f45205ec38ea70b #v4.1.4

      - name: Set python version
        uses: actions/setup-python@82c7e631bb3cdc910f68e0081d67478d79c6982d #v5.1.0
        with:
          python-version: "3.11"

      - name: Install pipenv
        run: pip install pipenv

      - name: Setup venv
        run: make venv

      - name: test
        run: |
          pipenv run panther_analysis_tool test
Code language: YAML (yaml)
YAML uses indentation to denote hierarchy and dashes to denote list items. Any code that begins with a # is a comment, like #v4.1.4.
At the top level of the hierarchy there are two keys:
Within the test job, three keys define basic information about the job:
Each individual step starts with a dash. Here’s a breakdown of the keys used within steps:
To summarize, when a pull request is opened or updated, the test.yml workflow will:
lint.yml is also a part of continuous integration. Linting discovers code syntax or style issues when changes are submitted through a pull request, verifying that new code integrates into existing code without errors.
Here’s the YAML in lint.yml:
on:
  pull_request:

jobs:
  lint:
    name: Lint
    runs-on: ubuntu-latest

    steps:
      - name: Checkout panther-analysis
        uses: actions/checkout@0ad4b8fadaa221de15dcec353f45205ec38ea70b #v4.1.4

      - name: Set python version
        uses: actions/setup-python@82c7e631bb3cdc910f68e0081d67478d79c6982d #v5.1.0
        with:
          python-version: "3.11"

      - name: Install pipenv
        run: pip install pipenv

      - name: Setup venv
        run: make venv

      - name: make lint
        run: make lint
Code language: YAML (yaml)
Much of the lint.yml workflow is the same as you saw in test.yml. The key differences are that the job ID is lint and the job name is Lint to match the purpose of this workflow, and the last step is linting instead of testing. To summarize, when a pull request is opened or updated, the lint.yml workflow will:
The final part of the pipeline is upload.yml, the continuous delivery (CD) workflow that deploys changes to your Panther instance.
Here’s the YAML in upload.yml:
on:
  push:
    branches:
      - main

jobs:
  upload:
    name: Upload
    runs-on: ubuntu-latest
    env:
      API_HOST: ${{ secrets.API_HOST }}
      API_TOKEN: ${{ secrets.API_TOKEN }}
    steps:
      - name: Validate Secrets
        if: ${{ env.API_HOST == '' || env.API_TOKEN == '' }}
        run: |
          echo "API_HOST or API_TOKEN not set"
          exit 0

      - name: Checkout panther-analysis
        uses: actions/checkout@0ad4b8fadaa221de15dcec353f45205ec38ea70b #v4.1.4

      - name: Set python version
        uses: actions/setup-python@82c7e631bb3cdc910f68e0081d67478d79c6982d #v5.1.0
        with:
          python-version: "3.11"

      - name: Install pipenv
        run: pip install pipenv

      - name: Setup venv
        run: make venv

      - name: validate
        run: |
          pipenv run panther_analysis_tool validate --api-host ${{ env.API_HOST }} --api-token ${{ env.API_TOKEN }}

      - name: upload
        run: |
          pipenv run panther_analysis_tool upload --api-host ${{ env.API_HOST }} --api-token ${{ env.API_TOKEN }}

Code language: YAML (yaml)
There are a handful of differences from the previous two workflows. First, take a look at the on key:
Now check out the jobs key. Here are the key differences from test.yml and lint.yml:
To summarize, when a push is made to the main branch, the upload.yml workflow will:
With this blog’s earlier prerequisites complete and the test.yml, lint.yml, and upload.yml workflow templates within your repository, you have a CI/CD pipeline ready to use with DaC. Let’s invoke the pipeline by working through an example of updating detection logic using the CLI.
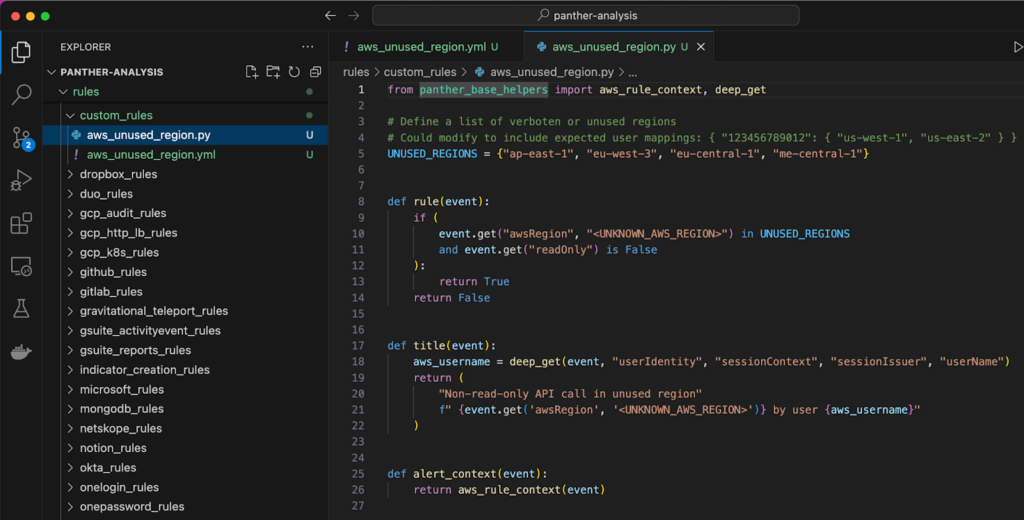
Let’s say that you need to adjust the list of unused AWS regions in aws_unused_region.py. This detection monitors for adversaries trying to evade discovery by operating in these regions. Here’s what you’ll do:
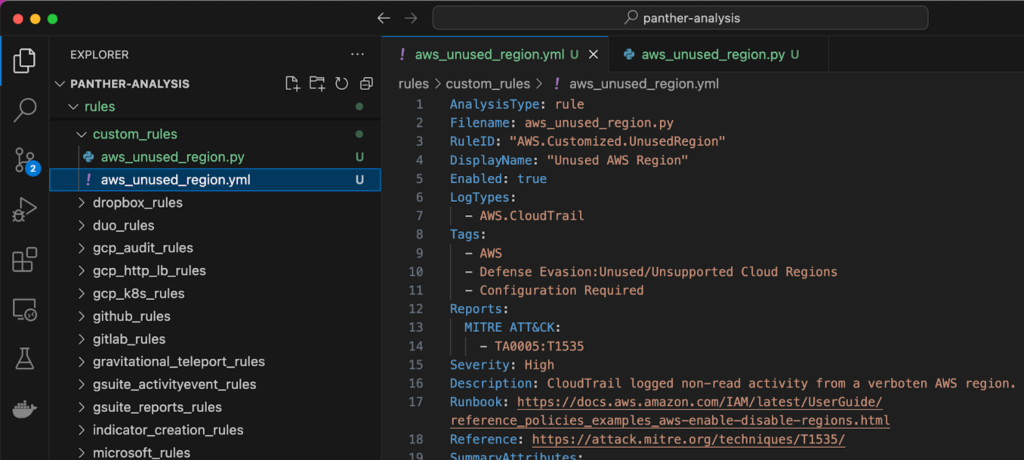
8. Next, open rules/custom_rules/aws_unused_region.py to update the detection logic. Let’s say that your org does not use the Middle East region in the United Arab Emirates. On line 5, simply add “me-central-1” to the UNUSED_REGIONS set and save your changes
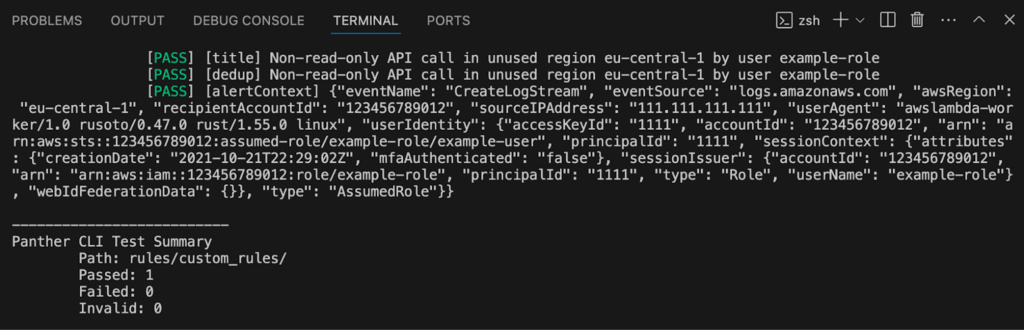
9. Any change to detection content needs to be matched with a test, following test driven development. Tests are declared in the YAML metadata file. Open rules/custom_rules/aws_unused_region.yml and you’ll find three tests that verify that only unused AWS regions trigger an alert. Since the test cases are covered, the next step is to verify that your changes have not broken the existing tests. Run pat test –path rules/custom_rules/ in your terminal to check
10. Next, commit your changes to version control history and push your feature branch to the remote repository
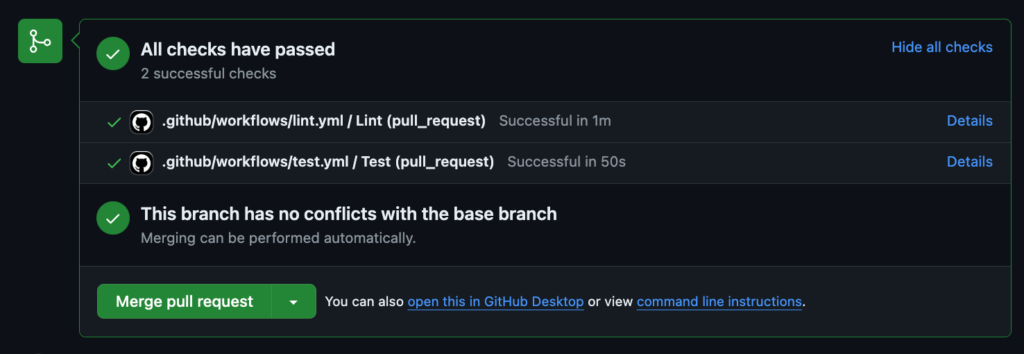
11. Within GitHub, open a new PR for your feature branch, and this will trigger the CI workflow. Any failing checks should be addressed before moving to the next step. At this point, a colleague typically reviews your PR to approve it or request further changes.
12. Merge the PR into the production branch. This will trigger the CD workflow to upload enabled detection content to the Panther console.
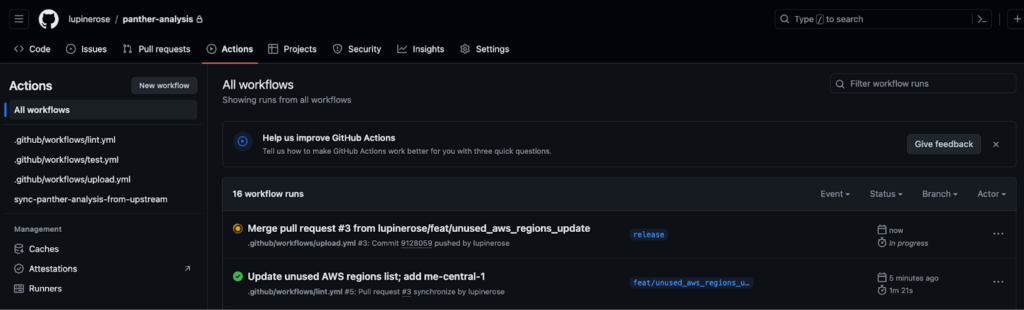
13. Select the Actions tab within GitHub, and you’ll see the release workflow queued up, as well as a history of other workflows. Eventually this will update to a green check mark indicating a successful CD workflow, or a red X that means that something in the CD workflow needs to be fixed.
And that’s it! After the CD process is complete, you’ll be able to find your changes deployed in the Panther Console.
Setting up automated testing and deployment with a CI/CD pipeline is just the start of how you can streamline your work with GitHub Actions. Here’s what you should look into next:
Using code to manage detection content in the detection-as-code paradigm enables teams to streamline workflows with time-tested software development best practices: version control, automation with CI/CD pipelines, and test-driven development. These support agile workflows that scale, remain flexible in response to rapidly changing attack vectors, and enforce consistency and quality—essentials for modern security teams to stay ahead of threats.
Panther is the leading cloud-native SIEM that offers the highly flexible detection-as-code backed by a serverless security data lake. Ready to try Panther? Request a demo to get started.